

Mediocre Kitchen Madness: February Edition!
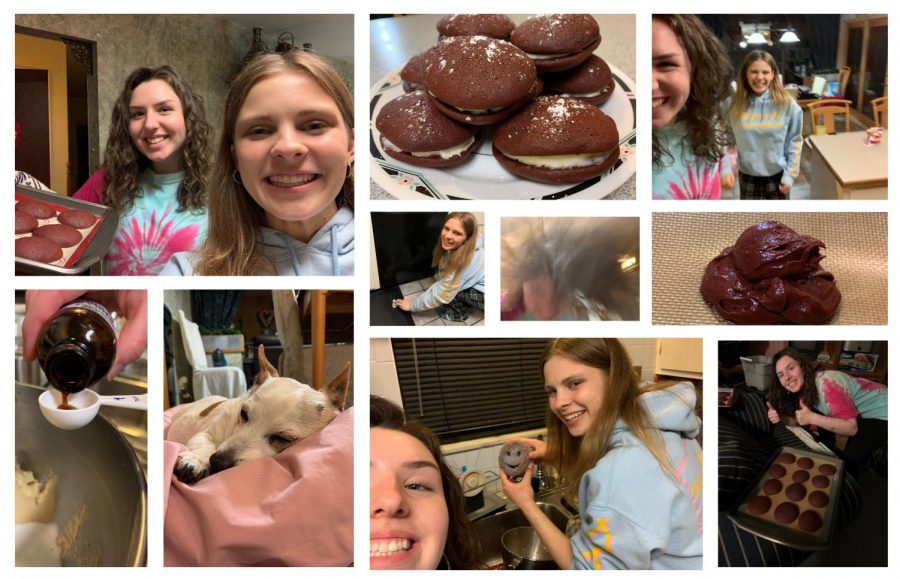
– Hellooooo everyone!! It’s Haley…
– …and Maggie!
– We’re here to welcome you to the February edition of Mediocre Kitchen Madness!
– Today, we’ll be bringing you a fresh take on the classic red velvet flavor- red velvet whoopie pies.
– Everyone give a round of applause to Sally’s Baking Addiction for supplying us with another delicious recipe.
– She should sponsor us at this point, tbh.
– But, enough about that, let’s jump right into the ingredients!
For the cookies:
- 2 cups all-purpose flour
- 3 tbsp unsweetened natural cocoa powder
- 1 tsp baking soda
- ½ tsp salt
- ½ cup unsalted butter
- 1 cup packed brown sugar
- 1 large egg
- ⅔ cup buttermilk
- 2 tsp pure vanilla extract
- Red gel food coloring
For the cream cheese filling:
- 6 oz block cream cheese
- ¼ cup unsalted butter
- 1 ½ cups confectioners sugar
- ½ tsp pure vanilla extract
– The cookies and cream cheese filling will be done separately and then combined at the end, after baking.
– Make sure to do the cookies first or else you’ll run the risk of eating all the filling before the cookies are even done.
Preheat the oven to 350º and line two large baking sheets with silicone baking mats.
– You could use parchment paper, but silicone baking mats are highly recommended for their amazing nonstick properties.
– And they’re less wasteful!
Whisk the flour, cocoa powder, baking soda, and salt together.
– This is the basic part. No stand mixer yet.
– But upgrades are coming.
With the stand mixer fitted with a paddle attachment, beat the room temperature butter for one minute on medium-high speed until completely smooth. Add the brown sugar and beat on medium-high speed again until combined. Beat in egg on high speed.
– At this point, the mixture looked like peanut butter pie filling and was very tempting to eat…
– Very tempting indeed. Not going to lie, I might have taken a small taste…
– Did it taste good?
– Didn’t live up to my expectations if I’m being honest.
Beat in the vanilla and buttermilk on low, making the mixture look curdled.
– I failed at this section. Despite countless directives from Haley not to turn the mixer on too fast, I turned the mixer on too fast.
– Tsk tsk tsk…
– Then I had to clean the floor… and the counters… and my clothes…
Gradually add the dry ingredients to the wet ingredients on low speed until combined.
– The mixture takes a while to turn into dough. It looks really curdled for a long time…
– …and then at the very end, it decides to *all come together.*
Add enough food coloring to make the batter a reddish hue.
– We…uhh…added a lot…
– Yeah, you’re going to need a lot more than you think, but fortunately, it didn’t end up tasting like food coloring.
Scoop 24 blobs of batter onto the baking sheets.
– Have patience with this step.
– The batter will not want to come off the spoon… and someone may question the noises coming from the kitchen.
Bake the cookies for 10-12 minutes and allow them to cool.
– Now it’s finally time to create the filling!
Again, using the stand mixer with the paddle attachment, beat the cream cheese on high speed until smooth. Beat in the butter until combined. Add confectioners sugar and vanilla and beat on high speed until the mixture is creamy.
– Now would be the appropriate time to lick the paddle attachment.
Pair up the cooled cookies based on their size, being cautious when removing cookies from sheets.
– We figured out the best way to remove them was to peel the baking sheet off of the cookie instead of just picking the cookie up off of the sheet.
– We lost a couple of middles before we figured this one out.
Spread cream cheese filling onto the bottoms of the cookies and then sandwich them together. Sprinkle confectioners’ sugar on top- if you would like.
– I loved these things! There was a perfect ratio of cookie to filling, and the cookies were cake-like, which made me like them even more. Plus, they were extremely sweet, which is my favorite way for desserts to be.
– I, on the other hand, wasn’t the biggest fan of these. I don’t love super sweet things and these were sickeningly sweet. They were good, don’t get me wrong, but I wouldn’t try them again.
– I would rate them a 10/10. I may or may not have eaten seven within a span of 24 hours…
– I would rate them a 4/10. I only ate half of one…
Thank you for reading the February edition of Mediocre Kitchen Madness. If you try this recipe, email pictures to [email protected] or [email protected] to be potentially featured in the next edition!
(Please… )
Your donation will support the student journalists of Highlands High School. Your contribution will allow us to cover our annual website hosting costs.
Trish • Feb 22, 2021 at 11:01 am
This is another very cute article. I really enjoy these. Sorry it took me so long to get around to reading it.